Best bobber stopper setup for suspending bait
Oh, the humble bobber stopper! It might seem like a small piece of gear, almost an afterthought, but believe me, mastering this little marvel can completely transform your fishing success, especially here in Alberta. We’ve all been there, right? You’re trying to present a bait at a very specific depth, maybe just above a weed line where you know the walleye are holding, or suspended delicately for finicky trout, and your traditional clip-on float just isn’t cutting it. It's either too shallow, too deep, or it snags on every cast. This guide is all about banishing those frustrations and showing you how to set up the best bobber stopper system to perfectly suspend your bait, giving you the edge you need to put more fish in the net.
Why Bobber Stoppers are Your Secret Weapon for Suspending Bait
Let’s be honest, fishing can be a game of inches, and when it comes to presenting your bait, those inches can make all the difference. Many anglers, especially those new to using floats, stick with the classic spring-loaded or clip-on models. While these have their place for shallower, fixed-depth fishing, they severely limit your versatility and precision, especially in deeper water or when you need to cast further. That’s where the bobber stopper setup shines, offering unparalleled control over your bait's depth and presentation.
The Frustration of Incorrect Depth
Think about those days when you're out on Lesser Slave Lake, targeting walleye that you know are lurking just off a deep drop-off, perhaps 15 or 20 feet down. If you're using a fixed float, you’re constantly struggling to measure out that much line above your float, making casting an absolute nightmare. The float ends up way down your line, tangling with every whip of the rod, and your bait never consistently reaches the strike zone. Or maybe you're trying to fish a small pocket in a river, where the trout are holding only a foot off the bottom, but the current keeps pushing your bait too high or dragging it along the riverbed. It’s incredibly frustrating when you know the fish are there, but your gear just won't let you get your offering in front of them effectively.
This constant battle with depth presentation can lead to missed bites, wasted time, and ultimately, a less enjoyable day on the water. It can feel like you’re doing everything right—the right bait, the right location—but something just isn't clicking. Often, that "something" is the ability to consistently and accurately suspend your bait exactly where the fish are feeding. This is particularly true when you’re targeting species like walleye that are often very depth-sensitive, or when trying to entice trout in clear, calm waters where a natural presentation is paramount.
Beyond the Fixed Float: Precision and Versatility
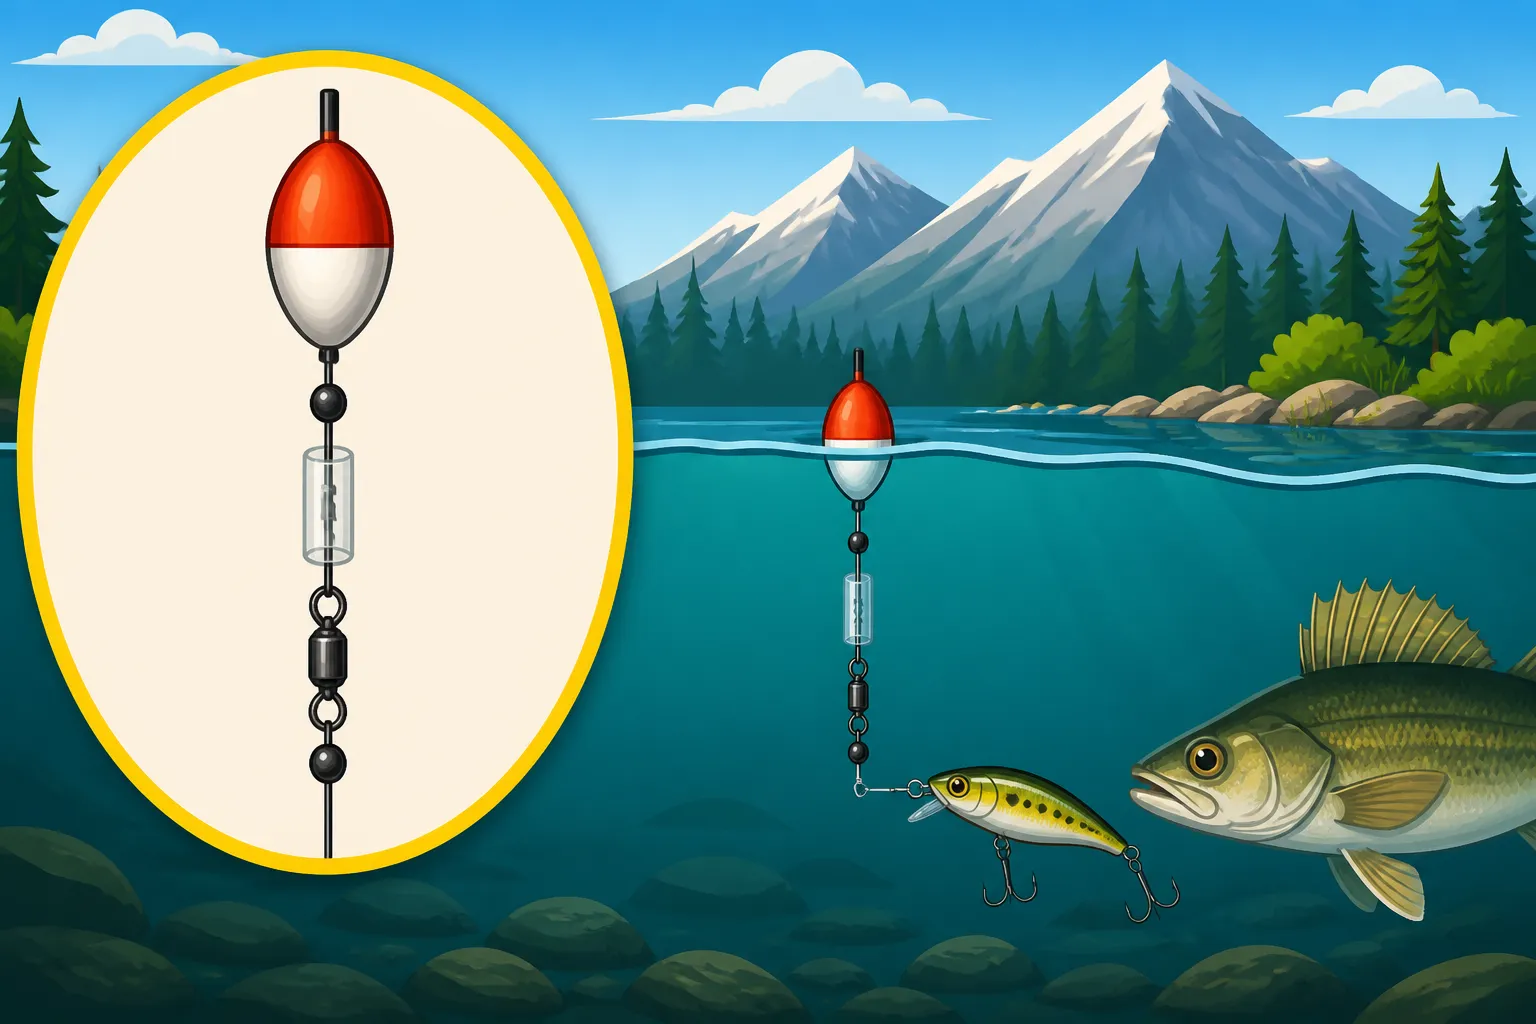
The beauty of a bobber stopper setup lies in its elegant simplicity and incredible functionality. Unlike a fixed float, which is tied directly to your line at a static depth, a bobber stopper allows your float to slide freely up and down your main line, stopping precisely where you've set it. This means you can cast with the float right next to your bait, ensuring a tangle-free delivery. Once the rig hits the water, the weight of your sinker pulls the line through the float until it reaches the tiny stopper knot, suspending your bait at the exact, pre-determined depth.
This versatility is a game-changer. Imagine fishing for How to Catch Walleye in Alberta on a large lake. With a bobber stopper, you can easily adjust your depth from 5 feet to 25 feet with a simple slide of the stopper knot, without ever re-tying your entire rig. This rapid adjustment capability allows you to quickly experiment with different depths until you find where the fish are actively feeding. It's also fantastic for fishing over submerged structure, like weed beds or fallen timber, where you need to keep your bait just above the snags. This precision helps you avoid snags, saving you time and money on lost tackle, and keeps your bait in the strike zone longer.
Understanding the Essential Components of a Bobber Stopper Setup
Building a reliable bobber stopper setup involves a few key components, each playing a crucial role in the system's efficiency and effectiveness. Getting these elements right is foundational to successfully suspending your bait, whether you're targeting big northern pike with a large dead bait or subtle panfish with a tiny jig. Don't skimp on quality here; a cheap stopper or bead can quickly lead to frustration and lost opportunities.
The Stopper Itself: Types and Materials
The bobber stopper is the heart of the system. Its job is to create a reliable, adjustable point on your line that prevents your float from sliding any further. There are generally two main types you'll encounter:
- Thread/Knot Stoppers: These are typically small pieces of braided thread or monofilament tied onto your main line. They often come pre-tied on a plastic sleeve, which you slide onto your line and then cinch down. Their advantage is that they are very small, pass easily through rod guides, and offer excellent sensitivity. They can be made from various materials, but nylon or fluorocarbon thread are common. Brands like Thill and Northland Fishing Tackle offer popular thread stoppers.
- Rubber/Silicone Stoppers: These are small, usually cylindrical or oval-shaped pieces of rubber or silicone that also come on a wire loop or plastic applicator. You thread your line through the loop, pull the stopper onto your main line, and then remove the applicator. They offer a bit more grip on the line than thread stoppers, which can be beneficial with heavier rigs or in strong currents. They tend to be a little bulkier, so they might not pass through very small rod guides as smoothly.
When choosing, consider your line type and diameter. A stopper that’s too loose will slip, defeating the purpose. One that’s too tight can damage your line. For most general fishing, a medium-sized thread stopper or small rubber stopper works perfectly on 6-12 lb monofilament or fluorocarbon. If you’re fishing with heavy braided line for species like How to Catch Northern Pike in Alberta, you might need a larger, more robust stopper to prevent slippage.
The Bead: Crucial for Smooth Operation
The bead, though small, is absolutely vital. It sits directly above the float and below the stopper. Its purpose is twofold:
- Protect the Knot: The bead provides a buffer between the float and the stopper knot. Without it, the eyelet of your float could eventually wear through or damage the stopper knot, causing it to fail. This is particularly important with plastic or metal eyelets on your float that can create friction.
- Smooth Sliding: The bead allows the float to slide freely up and down the line until it gently rests against the stopper. Its smooth, round surface minimizes friction against the float's eyelet, ensuring consistent depth setting and preventing hang-ups during casting or retrieving.
Beads come in various materials, including glass, plastic, and ceramic. Plastic beads are generally fine for most applications, but if you're using heavy line or a large float, a more durable glass or ceramic bead might be a better choice to withstand the pressure. Always make sure the hole in the bead is large enough for your main line to pass through freely, but not so large that it could pass over your stopper knot. A common mistake is using a bead that's too small, which can lead to it getting wedged inside the float's eyelet, or a bead that's too large, letting the stopper knot pull through. You can find a good selection of these small but mighty components at any reputable fishing outfitter like Bass Pro Shops or even online at Amazon.
The Bobber (Float): Matching it to Your Needs
The bobber, or float, is what signals a bite and holds your bait at the desired depth. Choosing the right float is crucial for balance, sensitivity, and casting performance. Floats come in a bewildering array of shapes, sizes, and materials, but for a bobber stopper setup, you'll generally be looking at slip floats.
- Cigar/Pencil Floats: These are slender and offer excellent sensitivity, making them ideal for light bites from species like perch or crappie. They don't offer much resistance to the fish, which is great for finicky eaters.
- Waggler/Clear Floats: Often clear and weighted at the bottom, these cast incredibly well and are very sensitive. They're popular for trout fishing in rivers where a natural drift is essential.
- Round/Oval Floats: More buoyant and visible, these are good for presenting heavier baits or in choppy water where visibility is key. They're a popular choice for How to Catch Walleye in Alberta when using larger minnows.
The size of your float should be matched to the amount of weight you're using to sink your bait. A good rule of thumb is that the float should be able to support your bait and sinker with just the tip of the float showing above the water. This provides maximum sensitivity and indicates even the lightest takes. If your float is too large for your weight, it'll ride too high and offer resistance to the fish. If it's too small, it won't support your bait, and you'll struggle to keep it suspended correctly.
The Weight and Hook: Balancing Your Rig
The final pieces of the puzzle are your terminal tackle: the weight and the hook. These are vital for achieving the desired depth and presentation.
- Weight (Sinker): Your sinker pulls your line through the float and is critical for both casting distance and getting your bait down to the desired depth. Split shot, egg sinkers, or even small bullet weights can be used. The amount of weight depends on the size of your float and the current/wind conditions. You want just enough weight to cock your float properly (so only the tip is showing) and to get your bait down efficiently without making it look unnatural. For finicky fish, a small amount of weight distributed above your hook (e.g., a few split shots) can make the bait look more natural as it drifts or hangs.
- Hook: Choose a hook size appropriate for your bait and target species. A hook that's too large can deter bites, while one that's too small might not hold the fish. For live bait, consider a baitholder hook or a circle hook to improve hook-up ratios and minimize harm to the fish. When fishing with minnows for walleye, a sturdy Aberdeen or Kahle hook is often a good choice. Always ensure your hook is sharp!
The balance between your float, weight, and bait is key. Your float needs to be sensitive enough to detect bites, but buoyant enough to suspend your bait at the chosen depth. Your weight needs to be heavy enough to pull your line through the float but not so heavy that it overpowers the float or makes your presentation unnatural. Experimentation is often necessary to find this sweet spot for different conditions and target species.
Step-by-Step Guide to Rigging Your Bobber Stopper Setup
Setting up a bobber stopper rig is straightforward once you know the sequence. Don't worry if it feels a little fiddly the first time; with a bit of practice, you'll be rigging these up in no time, and your fishing trips will be all the better for it. This method ensures your bait gets to where the fish are, tangle-free, every single time.
Preparing Your Line and Adding the Stopper
First things first, get yourself a comfortable length of line, whether it's spooled on your reel or a fresh section you're adding. This is your main line.
- Retrieve the Stopper: If you're using a thread stopper, it will likely come on a small plastic tube or wire loop. Gently thread your main line through the loop or tube, making sure to push a decent length of line through.
- Slide the Stopper: Carefully slide the pre-tied thread knot or rubber stopper off the applicator and onto your main line. Once it's on your line, remove the applicator (discarding it responsibly, please!). At this stage, don't cinch the stopper down too tight, as you'll want to adjust it later. For now, just make sure it's firmly on the line.
- Initial Placement: Slide the stopper up your line a fair distance from the end – maybe 3 to 4 feet. This is just a starting point; the exact depth will be adjusted once you're on the water. The beauty here is that this tiny stopper will determine the maximum depth your bait can go, yet it's small enough to reel right onto your spool and pass through your rod guides for easy casting. This is a huge advantage over fixed floats that make long casts at deep settings almost impossible.
Remember, the goal is a tight but adjustable grip on your line. A stopper that slides too easily will defeat the purpose, while one that's too difficult to move will make adjustments a pain. A good quality stopper, available at places like Bass Pro Shops, is well worth the small investment.
Attaching the Bead and Bobber
Now that your stopper is on, it's time to add the next two critical components.
- Add the Bead: Take your chosen bead (plastic, glass, or ceramic) and thread your main line through it. The bead should sit directly below your stopper knot. Ensure the hole in the bead is wide enough for your line but small enough that it won't slip over the stopper knot. The bead acts as a cushion and a smooth surface, ensuring the float doesn't bind against the stopper. Without it, the bobber's eyelet could wear through your stopper knot, leading to a lost rig.
- Attach the Bobber: Next, thread your main line through the bottom eyelet of your slip float. The float will now sit below the bead. Ensure the float's eyelet is smooth and free of any burrs that could fray your line. If your float has a top and bottom eyelet (some do), you typically thread through the bottom one. The line should pass freely through the float, allowing it to "slip" when tension is released.
At this point, you should have your stopper knot, then the bead, then the float, all in sequence on your main line. You're almost ready to add the business end of the rig! This simple order is what makes the slip float system so effective and versatile for anglers fishing in various depths, from shallow bays for panfish to deep holes for Lake Trout Fishing in Alberta.
The Terminal Tackle: Weight and Hook
With the float system in place, it’s time to complete your rig with the elements that will actually attract and catch fish.
- Add the Weight (Sinker): Depending on your preferred setup, you'll now attach your weight. For most bobber stopper rigs, a split shot or a small sliding sinker (like an egg sinker or bullet weight) is placed on the main line below the float. If using a sliding sinker, you might want to add another small bead below it to protect your knot when tying on the hook. The key here is to use enough weight to cock your float correctly (so it stands upright with only the tip visible) and to get your bait down to the desired depth. Too little weight, and your float won’t sit right, won’t cast well, and your bait might not get deep enough. Too much, and your float will sink, or your presentation will look unnatural.
- Tie on the Hook: Finally, tie your chosen hook to the very end of your main line using a strong, reliable knot like a Palomar knot or an improved clinch knot. Ensure the hook size is appropriate for your bait and the mouth of your target species. If you're using live bait like minnows for Best Baits for Walleye on Lesser Slave Lake, select a hook that allows the bait to swim naturally while still providing a good hook-up ratio. A strong knot here is non-negotiable – this is where the fish connects with your line!
Some anglers like to add a small swivel a foot or so above the hook, especially if using live bait that might twist the line. If you do this, ensure your weight is placed above the swivel. This also makes it easy to quickly change leader material or strength if needed.
Adjusting for Depth: The Key to Success
Now for the magic moment – setting your depth! This is where the bobber stopper really proves its worth.
- Initial Depth Setting: On shore, before you even make your first cast, make an educated guess about how deep you want your bait. Slide your bobber stopper up or down your main line to achieve this desired depth. A good starting point is often just above the known depth of structure or the bottom.
- Test and Refine: Once you're on the water, cast out your rig. Watch how the float sits. If it sinks, you need a more buoyant float or less weight. If it lays flat, you need more weight. If it stands straight up but looks like it's holding too much weight, you might want to reduce the weight for a more sensitive presentation.
- Fine-Tuning: The beauty of the stopper is that you can quickly and easily adjust your depth. If you’re not getting bites, slide the stopper a foot deeper, cast, and wait. Still no bites? Slide it up a foot. This iterative process allows you to methodically search the water column until you find where the fish are holding. This is particularly effective when you're targeting fish like trout in a stream where their feeding zone might change with water levels or insect hatches. You can even mark your line with a permanent marker at successful depths for future reference, although this isn’t always necessary with a reliable stopper.
Don't be afraid to experiment! The ability to swiftly change depths is a huge advantage, allowing you to react to changing fish behavior or environmental conditions. This ease of adjustment is what makes this setup so superior to fixed floats when precision depth presentation is required.
Advanced Tips and Common Pitfalls to Avoid
Even with a basic understanding, there are always ways to refine your bobber stopper setup and common mistakes that can hinder your success. A little extra knowledge and attention to detail can make a big difference, transforming a decent day of fishing into an unforgettable one.
When to Choose Which Stopper Type
While thread and rubber stoppers both do the job, understanding their nuances can optimize your rig for specific situations.
- Thread Stoppers (Small & Discreet): These are fantastic for finesse presentations, especially in clear water or when targeting line-shy fish like big Bow River trout. Their minimal bulk allows them to pass through even the smallest rod guides with ease, making long casts with deep settings much smoother. They offer excellent sensitivity and are less likely to spook wary fish because they're almost invisible in the water. However, if your line is very slick or of a very thin diameter, a thread stopper can sometimes slip, especially under the tension of a strong cast or a running fish. To counter this, some anglers will tie a double thread stopper or add a tiny drop of super glue away from the main line to help secure the knot's position once set.
- Rubber/Silicone Stoppers (Secure & Durable): When you're using heavier lines, larger floats, or fishing in conditions with strong currents or heavy winds, rubber stoppers really shine. Their firmer grip on the line makes them less prone to slippage, which is crucial when you need your bait to stay at an exact depth despite external forces. They are also generally more durable and less likely to wear out over time. The trade-off is that they are bulkier and can sometimes impede casting, especially if you need to reel the stopper onto your spool to cast a very deep rig. If your rod has small guides, a larger rubber stopper might catch, so choose a smaller size if possible or opt for thread. You can find both types readily available at any good tackle shop, or through online retailers like Amazon.
Consider the diameter of your line carefully. A stopper that’s too large for thin line will struggle to grip, and one that’s too small for thick line will either break or simply not fit. Matching the stopper to your line is paramount for a successful system.
Situational Adjustments: Wind, Current, and Target Species
Fishing conditions in Alberta can change in an instant, and being able to adapt your bobber stopper setup is key.
- Windy Conditions: Wind can be a real nuisance, making it difficult to cast accurately and causing your float to drift excessively. In these situations, you might want to use a slightly heavier float (like a waggler with a weighted bottom) or add a bit more weight to your terminal tackle. This will help your rig cut through the wind and keep your bait anchored more effectively. Also, a brighter, more visible float will help you spot bites in choppy water. When the wind really kicks up, it can make delicate bite detection difficult, so sometimes a heavier, more stable rig is the best compromise.
- Strong Currents (Rivers): When fishing rivers like the Oldman or portions of the Bow, where currents can be strong, preventing your bait from dragging is critical. Use enough weight to ensure your bait sinks quickly and stays at your desired depth, but not so much that it looks unnatural. Sometimes, distributing your split shot a few inches above the hook can help your bait tumble more naturally with the current while still being held at depth by the float. A longer, more slender float can also help cut through the current with less resistance than a rounder, bulkier float. How to Fish the Crowsnest River for Trout often involves varying current speeds, making this adaptability crucial.
- Target Species Considerations: Different fish have different feeding habits. For aggressive species like Northern Pike Fishing in Alberta, a slightly larger float and heavier tackle might be perfectly acceptable. However, for finicky panfish or delicate trout, an ultralight setup with a small, sensitive float and minimal weight is often required. When fishing for Walleye Fishing in Alberta, especially in deep lakes, a medium-sized slip float with enough weight to get a minnow down to 20+ feet quickly is ideal. Pay attention to how the fish are biting; a shy tap might mean you need a more sensitive float or less resistance from your rig.
Maintenance and Troubleshooting Your Setup
Like any fishing gear, your bobber stopper setup benefits from a little care and attention.
- Check Your Line: Before each outing, inspect your main line, especially the section that passes through the float and is gripped by the stopper. Look for any signs of fraying, nicks, or weak spots. The constant sliding of the stopper and float can cause wear over time, particularly with monofilament lines. If you see any damage, re-tie that section or replace your line entirely.
- Stopper Slippage: If your stopper knot starts slipping, it’s frustrating, but usually an easy fix. Try adding a second stopper knot a few inches above the first one – two points of resistance are often better than one. Alternatively, consider switching to a different type or brand of stopper that grips your line more effectively. Some anglers will moisten the line and stopper before sliding to help it grip better without causing friction damage.
- Tangles: While bobber stopper setups significantly reduce tangles compared to fixed floats in deep water, they can still happen. The most common cause is casting too aggressively or having too much slack in your line upon splashdown. Ensuring your line is straight and taut immediately after the cast can help prevent your float and bait from tangling. If you're consistently getting tangles, try a slightly heavier sinker to help your bait and hook fall away from the float more quickly. Also, check your leader length; sometimes a leader that's too long can contribute to tangles, especially with live bait.
- Storage: When you're done fishing, slide your stopper knot all the way down to your hook. This keeps your rig compact for storage and prevents your float from sliding around and getting damaged. Many anglers leave their bobber stopper rigs tied on and simply adjust the stopper for their next outing. This saves valuable time on the water.
A well-maintained bobber stopper setup is a reliable one, ready to help you nail those tricky depth presentations and bring in more fish. These small details might seem minor, but they add up to a significant improvement in your overall fishing experience.
Comparing Popular Bobber Stopper Types
To help you decide which bobber stopper might be best for your needs, here's a quick comparison of the most common types. Remember, the "best" choice often depends on your specific fishing conditions, line type, and target species.
| Feature | Thread/Knot Stoppers (e.g., Thill, Northland) | Rubber/Silicone Stoppers (e.g., VMC, Eagle Claw) |
|---|---|---|
| Material | Braided thread (nylon, Dacron, fluorocarbon) | Rubber, Silicone |
| Casting Smoothness | Excellent; passes through guides easily | Good to fair; can snag on small guides |
| Line Grip | Good; can slip on slicker lines or heavy casts | Excellent; very secure grip |
| Sensitivity | Very high; minimal weight/resistance | High; slightly more resistance than thread |
| Visibility | Low (often black, small) | Variable (often colored, slightly larger) |
| Adjustability | Easy to slide, can be slightly sticky | Very easy to slide; often smooth |
| Durability | Can wear out with repeated use/heavy friction | Very durable, long-lasting |
| Best For | Finesse fishing, clear water, light tackle, deep settings, small guides | Heavier lines, strong currents, wind, larger floats, general purpose |
| Common Issue | Slippage if not tight enough or on slick line | Can be bulky, may catch on small rod guides |
This table should give you a good starting point for selecting the right stopper for your fishing adventures. Don't be afraid to try both types to see what feels most comfortable and effective for your style of fishing.
Conclusion
Mastering the bobber stopper setup for suspending bait is truly one of those fundamental skills that can elevate your angling game, especially when fishing the diverse waters of Alberta. It frees you from the limitations of fixed floats, opening up a world of precise depth control that directly translates to more bites and more successful outings. No longer will you have to guess if your bait is in the strike zone; with a properly rigged bobber stopper, you'll know for sure.
Whether you're presenting a juicy minnow for Best Time of Day to Catch Walleye, delicately drifting a worm for perch, or even suspending a larger dead bait for a monster Northern Pike Growth Rate to Trophy Size, the confidence that comes from knowing your bait is exactly where it needs to be is invaluable. So, next time you're gearing up for a day on the water, grab some bobber stoppers, beads, and slip floats. Spend a few minutes setting up your rig, and you'll quickly discover why this seemingly simple piece of tackle is a true game-changer for anglers seeking precision and versatility in their fishing.
Disclaimer
This article is for general informational purposes only and does not constitute professional advice. Laws, prices and regulations vary by location and change over time. Consult a qualified professional for guidance on your specific situation.